This document covers calibrating the BGO array using a
radioactive gamma source.
Note:
On the head or gamma-ray side, each of the 30 BGO signals is split (split anode
panel), with one branch going to the ADC (including an appropriate delay to
put it inside the gate) and the other fed into a constant-fraction discriminator
(CFD) channel. Due to the number of signals, two CFDs are employed, with
each able to accommodate up to 16 signals. Each channel of the CFD has an
individual output that is fed into a TDC measurement channel. Additionally,
each CFD provides an OR output that fires any time one of its channels receives
a signal. These two OR outputs are what is fed into the IO32 ECL input to
generate the "grand" trigger for the head side.
In addition to the CFDs, the accelerator RF pulse is also fed into one of the
TDC measurement channels, to provide a time reference that correlates with
the generation of a beam particle.
Calibration instructions
Get the CmC13 source (Make sure, you have the necessary radiation
safety training and source handling training!) from the shielded
lead safe on the DRAGON floor (usually somewhere south of the desk).
This source produces a 6.13 MeV gamma-ray via the 13C(alpha,n)16O + gamma
reaction.
The key to the padlock is inside the red DRAGON source folder, located
on top of the radiation source safe. The source is placed in a paraffin
container inside the shielded safe. Always make sure to put it back into
the paraffin before closing the safe after use. Wear gloves when handling the source and lead in the shielded safe.
Carefully crank the "far" BGO array (N/E) all the way in. Then crank
in the "near" array almost all the way. Be careful not to damage the thin
copper line that connects to the pressure gauge. The plumbing here is
often source of leaks. Make sure any C-clamps have been removed from
the target housing, and check that nothing could collide with the BGOs
when cranking the array in. You will see a small gap between the top of
the gas target box and the detectors. Carefully wedge the 9 x 20mm source capsule in there
(z=0) and then close the "near" array fully.
Note:You have to calibrate with the array fully closed - the phototubes are sensitive to very small local
magnetic field changes and it was determined that the detector position does affect this!
Go to the DRAGON MIDAS page https://smaug.triumf.ca:8443/, and click "Adjust BGO
Thresholds" on the menu bar on the left.
Set the variable "Threshold
Gamma Energy" to the maximum value of 2500 keV. Note that "Threshold Gamma Energy" corresponds to the threshold in keV.
Then go back to the status page and click "Apply thresholds".
Open up a terminal and ssh dragon@smaug.triumf.ca, issue hvcalib (./hvcalib) to start the calibration program.
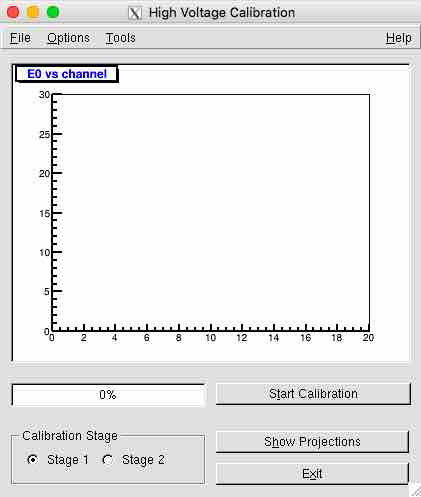
The start page for the HV calibration program will appear (see Fig. 1).
Fig.1 - HV calibration program.
From the DRAGON MIDAS Status page, click "Start" to start a run and give it a decently descriptive comment and check the "write data" box.
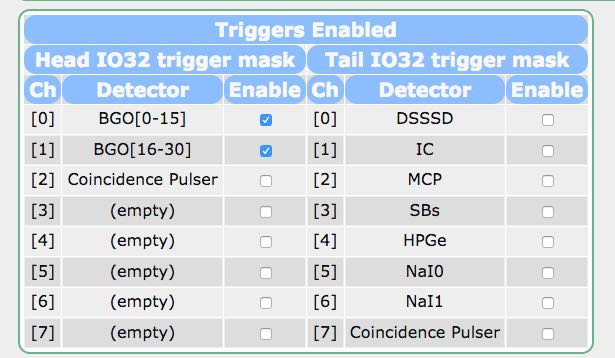
Note: Make sure you enabled the trigger for the BGO events. You can verify this by going on the MIDAS start page and click on ODBStatus on the left menu bar.
Then enable Channel 0 and 1 (see Fig.2).
Fig.2 - ODB Status - Triggers Enabled.
Once the run has started you should now start seeing the histogram on the hvcalib program filling in.
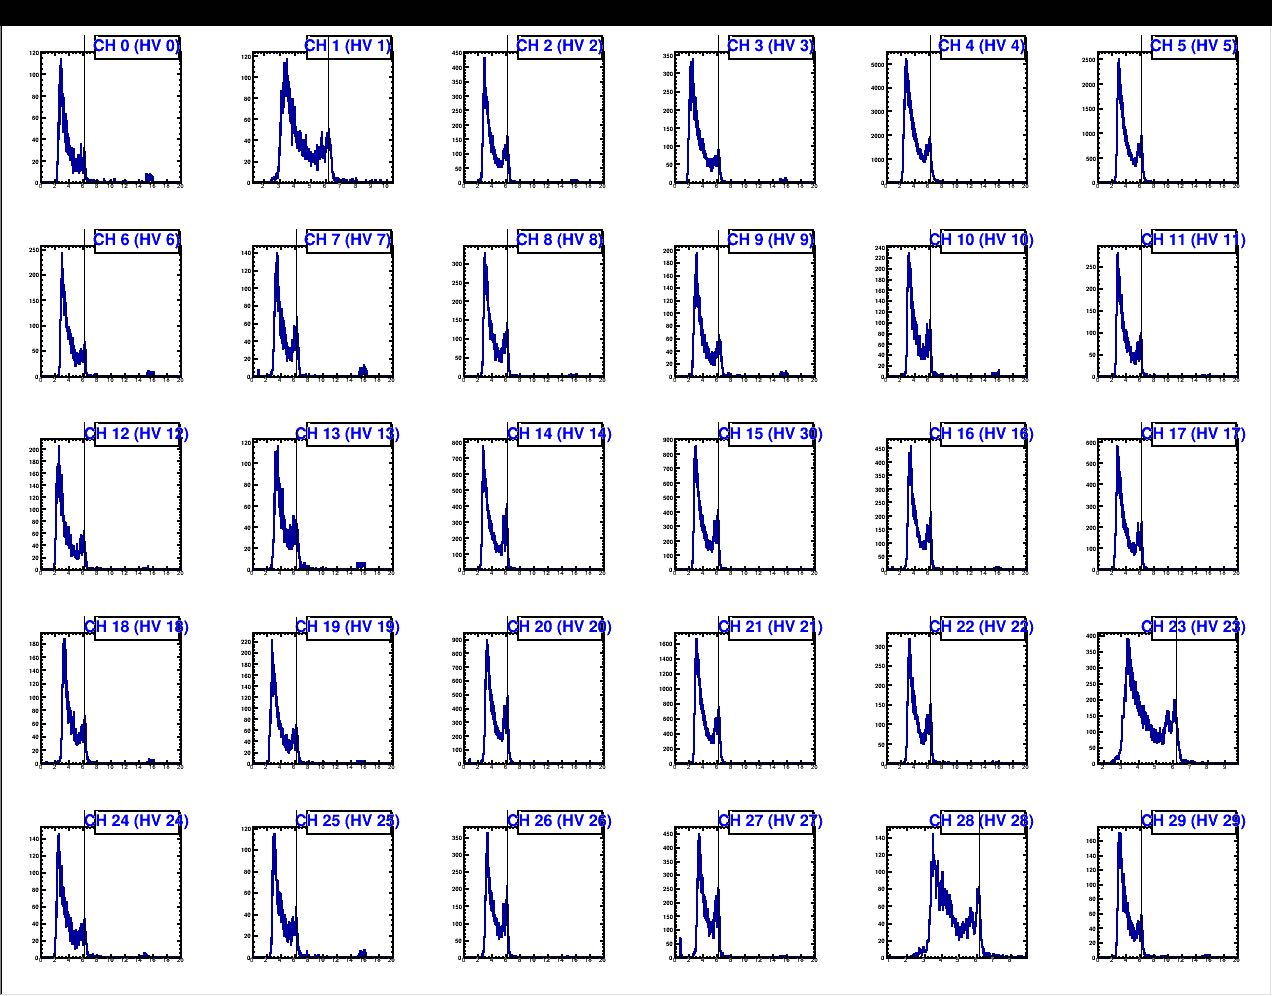
Let it collect data for 5 - 10 minutes to get some statistics. Click on "Show Projections" (see Fig. 3) to see the individual 1D spectra for each detector as
they are accumulating (so you can look for evidence of the 6.13 MeV peak easier).
Fig.3 - Projected spectra.
After about 10 min stop the MIDAS run and click on "Start Calibration" on the hvcalib window.
The first spectrum from BGO channel 0 will appear. Right click on the location you find the 6.13 MeV peak.
It should be near the high end of the spectrum. In some channels there are two bumps there (the 6.13 MeV peak
plus the 511 keV escape peak), and the 6.13 MeV calibration peak is the
higher energy one. In other channels the peaks may not be resolved. Do not worry about being too precise - we just need calibration to within
100 keV. You can right click again if you clicked the wrong location at first.
Middle click to advance to the next channel, then repeat for all 30 detectors. If any of them look strange or you cannot find the peak just do your
best guess.
Once you are done, the program will show the new voltages that it has calculated. Click okay and it will change them.
This takes 30-40 seconds while the voltages ramp up/down.
You can watch the ramp up/down on the HV status page, which you find by on the MIDAS status page by clicking on "HV" on the menu bar.
There you can compare the demanded voltage to the output voltage. They should be the same once the voltages were adjusted.
Advance the "Calibration Stage" button to "Stage 2", then repeat steps 5 - 9.
Start another run and collect decent statistics to see if the peaks are
roughly aligned. If the peaks are all good, the calibration is done. Otherwise, quit hvcalib and repeat steps 4 - 9.
Notes:
Sometimes if a channel is really off calibration it will look extremely strange, enough that one might think the detector is broken. However, it
likely is not! The voltages are very sensitive and being off 10-20 V can squash or extend the spectrum beyond comprehension. If 1-2 channels are
behaving like this, start by calibrating all the other detectors first, then adjust the problem channels manually until they look to be close. Then
run through one last calibration to align everything
Should it be required to change the full scale range (FSR) of the energy spectrum, the easiest way to change the BGO range is to adjust the
/dragon/bgo/variables/adc/slope[0-30] values in the ODB.
Then after doing that, run the hvcalib program to adjust the gains. A slope setting of 0.00415 should put the 6.13 MeV calibration
gamma-ray at channel 1477.
Extending the range means making the slope larger, which will move the 6.13 MeV gamma-peak to a lower channel.
The hvcalib program works off calibrated gamma-ray values, so one does not have to do anything other than change the slope before doing the calibration.
Sometimes it may be required to recover previous BGO HV values. In
order to do so, you can run the ”hvrecover” program to return the BGO
HV settings to a prior state. This is to avoid confusion with loading an
old ODB file and potentially changing things one does not intend to, etc.
it also avoids manually typing in values. To use it:
ssh into smaug.triumf.ca as user "dragon"
hvrecover < xmlfile >
where < xmlfile > is the ODB output for a run with the desired voltages, i.e. /data2/dragon/OfflineTests/data/run12345.xml.
This will change the settings of /Equipment/Wiener01/Settings/outputVoltage to be what
they were in the specified run. As long as fewiener.exe is running, this will cause the actual hardware values to update as well.
This is left over from the previous instructions, and may still be valid:
When a large change to the BGO HV's is needed, it is usually best
to start from a rough calibration and go from there. For this purpose
there is an example ODB file that can be used to set the BGO full
scale to ~10 MeV. Load the "~/online/hvcalib/example/hv3.odb" file
(see Changing the online
databases). Then start hvcontrol in a terminal and change the
voltages:
[dragon@isdaq04]~/online>> hvcontrol
The program echos many messages ending with:
Registering for transitions
HV control ready
Enter 'c' to change voltages, 'r' to check voltages or 'q' to quit
Waiting for ODB HV values to change...
Type "c" in the terminal, then press enter to change the
voltages. They will be reset to whatever are held in the ODB (which
should be those just loaded).