The DRAGON gas target and the separator magnets, electrostatics,
vacuum, and diagnostics are operated through the EPICS control system.
The PC with dual monitors located near the gas target control rack
should be dedicated to EPICS control of DRAGON. Normally, this PC should
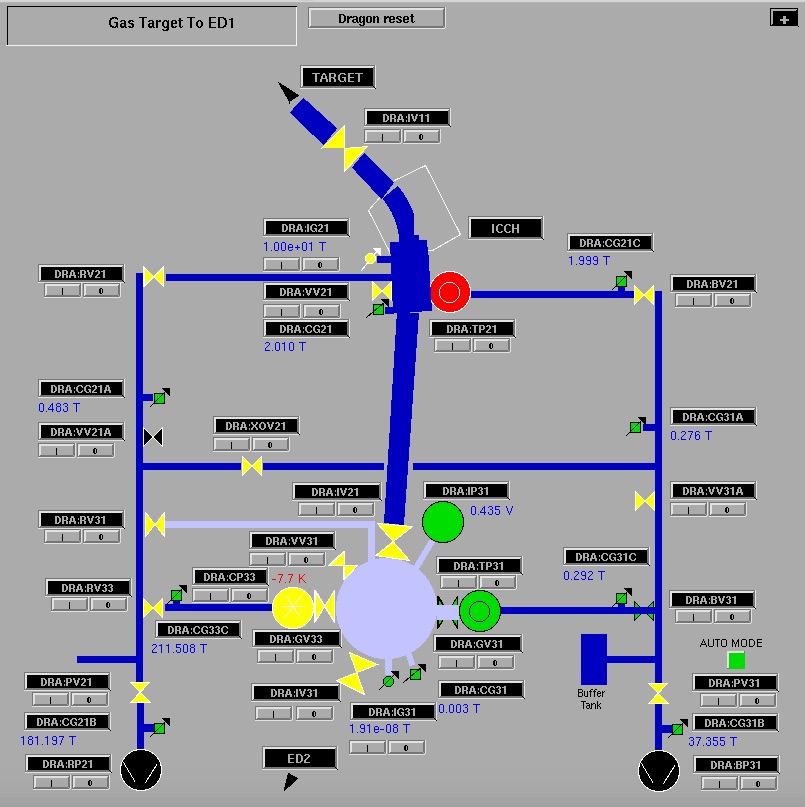
be up and running a DRAGON menu (Fig. 1).
Fig.1 - EPICS control panel.
If the DRAGON menu bar and/or specific
pages are not displayed, possible reasons are:
The screen-saver has gone to a dark screen. Move mouse and wait 10 seconds.
The DRAGON connection window has been minimized. Look for "dragon"
as the name of a minimized window (lower strip on left-hand monitor).
If one is present, maximize it (should appear as a text window in the
middle of the right-hand monitor). If none is present, establish a
new connection (see below).
The connection between the PC and EPICS server has died. Delete any
windows that indicate "not connected". Reconnect to an EPICS server
by double-clicking the icon "EPICS".
The PC has crashed and is trying to re-establish ethernet connections.
Click "Cancel" on the window asking for a password, and connect to
an EPICS server (see above).
To connect to EPICS from isdaq04, click on the "EPICS" icon.
To connect from a linux computer via the network,
"ssh dragon@isacepics1". (The dragon password is required.)
Some items in the DRAGON menu bar have sub-menus. To see them, place
the cursor over the main menu item and depress the left mouse button.
Device icons are color-coded as follows:
red: device faulty or not responding
black: device is off, but may be turned on
yellow:
device is off, some interlock condition(s) not satisfied
or
interlocks for the device have been bypassed
light green: device is on
dark green: device is coming on
Click on "1" to turn a device On. Click on "0" to turn it Off.
Left-clicking on a device icon will call up a window with more
detailed information/options. The "RST" button will reset the device,
as may be required to remove a fault condition (or sometimes must be
done before turning a device On even though no fault is indicated).
If interlock conditions apply to the device, those shown in black are
satisfied and those shown in yellow are not satisfied.
The standard tool for changing magnet currents is a slider bar.
To use the control, place the cursor in the slider area, beside the
slider button and left-click; the slider area should show color.
Right-click to make a direct entry or to customize the slider
action. To make a direct entry, change to the desired "Value"
(remember to ENTER) then click Apply, OK.
To customize the slider select the appropriate values from the
drop-down menus for Increment and Sensitivity, then click Apply, OK.
When the slider "knob" is dragged to the edge of the slider box (to a
value in the range defined by Sensitivity), the edge value becomes
the new central value and the knob jumps back to the centre of the
slider range.
The magnets and electrostatic dipoles are controlled via a Canbus
chain. If these devices show red icons, a Canbus reset may be
called for. From the EPICS menu, select DIAGNOSTICS|Canbus
diagnostics and select the device. If the "Alive" indicator is
not green, click on CFG and wait 10 seconds. If "Alive" goes green
or already was green, go to the regular control panel for the device.
If "Alive" does not go green, consult Controls group or an ISAC
Operator for help.
If Canbus shows a device is "Alive" but the RST button doesn't bring
it to a ready state (icon stays red), the problem is likely to be
a device failure or loss of power (e.g. MD breaker tripped or
ED ac power cut by the hardware interlock).
dah
15/12/2006
A Typical EPICS Window
(To view, select "Vacuum:Target to ED1" under "ISAC Control System (DRAGON Access).")