In order to calibrate the DSSSD you need to start by taking a pulser walk for the front and back strips of the DSSSD.
There is a BNC cable near the NIM bin where DSSSD is housed. That cable should be plugged into the signal output of the pulser (there are 3 outputs on the pulser, a signal output, a trigger output, and something
else...)
On the other side of the rack, the other end of that BNC cable should be hanging from the cable tray and be labeled pulser.
Plug that into either of the free BNC cables (with barrel) hanging from the DSSSD preamp I/O board (the long cable is the pulser test for the front strips and the
short one is the pulser test for the back strips).
The front strips take a positive pulser signal, while the back strips take a negative pulser signal.
Try using the following pulser settings for the front and back strips:
Front
Attenuation: 2X
Fall time: 150 us
Amplitude: 0.2 - 1.2 V
Polarity: positive
Back
Attenuation: 2X
Fall time: 150 us
Amplitude: 0.05 - 0.7 V
Polarity: negative
Once the pulser is connected to the DSSSD, you should be able to look at
the signals on the scope using the twisted pair to BNC cable.
Data collection
To prepare the DSSSD for data collection:
Make sure the RAL amplifier crate in the E tail rack is powered off
(the power switch is on the rear of the crate).
Make sure the Ortec HV unit in the West tail rack is powered off.
Make sure the heavy copper braid and the (aluminum?) braid from the
pulser-test/fan power I/O board (wrapped in Al foil) is attached to the
DSSSD box and that the heavy copper braid is grounded to the East electronics
rack.
Re-attach the preamp box to the DSSSD box (if you haven't already
done so) and remove the lid.
Attach the short ribbon cable from the feed-through to the the preamp
pcb (if you haven't already done so).
Attach the HV cable (the black cable with the gold elbow joint and
locking nut) to the preamp pcb (if it's not already attached - a gold input
on the SE side of the board when it's attached to the beamline).
Attach the blue 8 channel ribbon cable from the
pulser-test/fan power I/O board to the preamp pcb (blue terminal on the NE
side of the board when it's attached to the beamline).
Replace the lid of the preamp box.
Attach the SHV cable from the Ortec unit to the SHV input on the rear
of the preamp box.
Re-attach the BNC cable connected to the fans on top of the preamp
box's lid to the BNC splitter connected to the pulser/fan power I/O board.
Re-attach the ribbon cables from the RAL amplifiers to the
appropriate outputs on the back of the preamp box (the cables & outputs are
labelled "front" and "back," and the orientation of the cables should be
obvious from the way they are bent).
Power on the RAL crate. After powering it on, make sure that all of
the led power indicators on the front of the crate are illuminated (channel
1 is flaky sometimes); if not power it down, wait ~20 s and power it back
on again.
If the DSSSD box is at vacuum, you can bias the DSSSD (negative bias) to -60 V (be sure to know the type and thickness of DSSSD before applying voltage)
Take note of the number of triggers presented & acquired (on the
visual scalers in the W tail rack) once the DSSSD is biased. If the rate is
high (>100 Hz), see if you can reduce it by changing the position/orientation of the I/O board. If the rate is extremely high (>10
kHz) and does not change when fiddling with the I/O board, this may be an indication that the detector is not functioning properly.
Noice could also be introduced by the mini-turbo controller. If so, try to shield it.
If the scaler rates are low (few Hz), you are now ready to collect data.
To take an alpha source calibration run:
Insert the triple -alpha source into the beamline by setting the manual
drive to 84 mm (see FSB_alpha.html).
Open a browser window and navigate to the DAQ web interface (
http://smaug.triumf.ca:8081). If the page is not available, open a
secure shell to smaug and run the start_daq.sh script.
Open a secure shell into smaug and type dsssd_reset (this removes the
calibrated slope and offset values from the DSSSD's ADC channels).
Start rootbeer (in a new terminal window, ssh smaug and then type 'rbdragon')
In rootbeer, click the "attach online" and "start refresh" buttons.
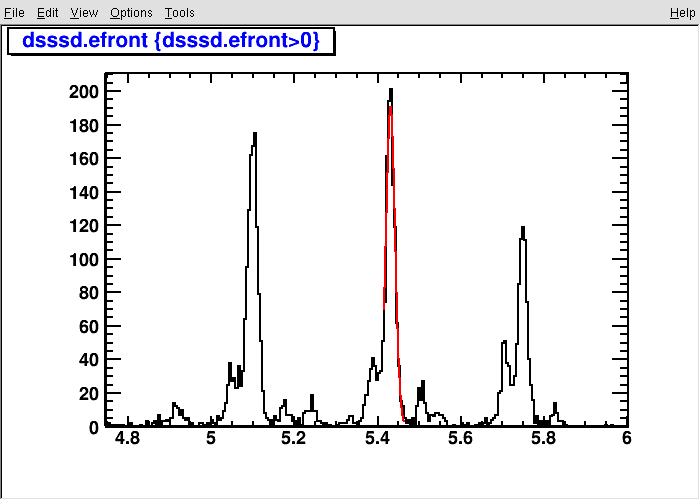
Double click on the DSSSD summary histgram under the heavy ion
singles tree in the histograms menu named dsssdE - you will want to re-bin
it so that it has >= 1024 bins
Start the dragon scaler (in a new terminal window, ssh smaug and then
dragonscaler)
Start a new run (make sure the "collect data" box is checked).
In EPICS, open DRA:IV61 and remove FCF. The histogram(s) should now start updating.
Calibration
To run the DSSSD calibration scriptL
ssh into smaug, type "cd $DH"
run the mid2root script on the run numbers of the pulser runs for the front
and back strips and the triple-alpha run using the singles flag:
mid2root runxxxx.mid --singles
type 'dsssd_cal xxxx yyyy zzzz'
where xxxx is the front strips' pulser walk run number, yyyy is the back strips' pulser walk run number, and zzzz is the triple alpha run number.